How to Build an Online Store with WordPress & WooCommerce

Story By Blogging Field

Dec 02 β€” 2025

online store with wordpress and woocommerce for ecommerce website development and online product selling
You do not need a developer. You do not need a large budget. Furthermore, you do not need months of technical training to launch a professional e-commerce store that handles real products, real payments, and real customers.
WordPress combined with WooCommerce powers over 30% of all online stores worldwide. It gives you complete ownership of your store, unlimited flexibility, and access to thousands of free and premium tools β€” all without paying expensive monthly platform fees.
In this step-by-step guide, we walk through everything β€” from choosing hosting to adding products to accepting payments. Therefore, by the end, you will have a clear roadmap to launch your own online store with confidence.

What You Need Before You Start?

Before building your store, prepare these three essentials:
That’s it. Everything else gets set up during the process.

Starting your WooCommerce store

Step 1: Select WooCommerce Hosting
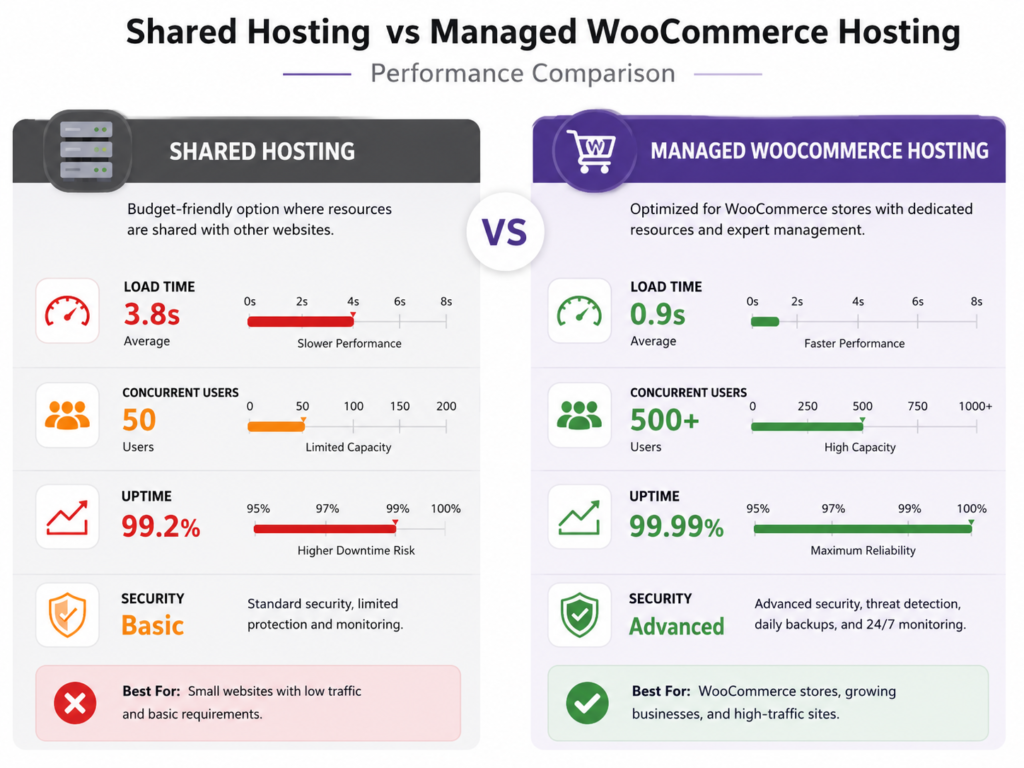
Comparison graphic showing Shared Hosting vs Managed WooCommerce Hosting performance, highlighting load time, concurrent users, uptime, security, and best use cases for WooCommerce stores.
Your hosting provider is the single most important decision you make for store speed and reliability. A slow host creates frustrated customers β€” and frustrated customers do not buy. Furthermore, poor hosting hurts your Google search rankings directly through Core Web Vitals performance scores.
Managed WooCommerce hosting handles server configuration automatically. Consequently, you spend less time on technical setup and more time building your store.

πŸ‘‰ Read our detailed guide: How to Choose the Best WordPress Hosting

Step 2: Register Your Domain Name

Your domain name is your store’s identity online. Choose it carefully β€” changing it later creates SEO and branding complications.

Tips for Choosing a Good Store Domain

  • Keep it short β€” under 15 characters if possible
  • Make it memorable β€” easy to spell and say out loud
  • Use .com β€” still the most trusted extension for stores
  • Avoid hyphens and numbers β€” they create confusion
  • Match your brand β€” domain and business name should align
Most hosting providers let you register a domain during the hosting signup process. Furthermore, many include a free domain for the first year. Consequently, you can handle both in one step without visiting a separate registrar.

Step 3: Install WordPress and WooCommerce

With hosting active and domain connected, installing WordPress takes under five minutes through your hosting control panel.
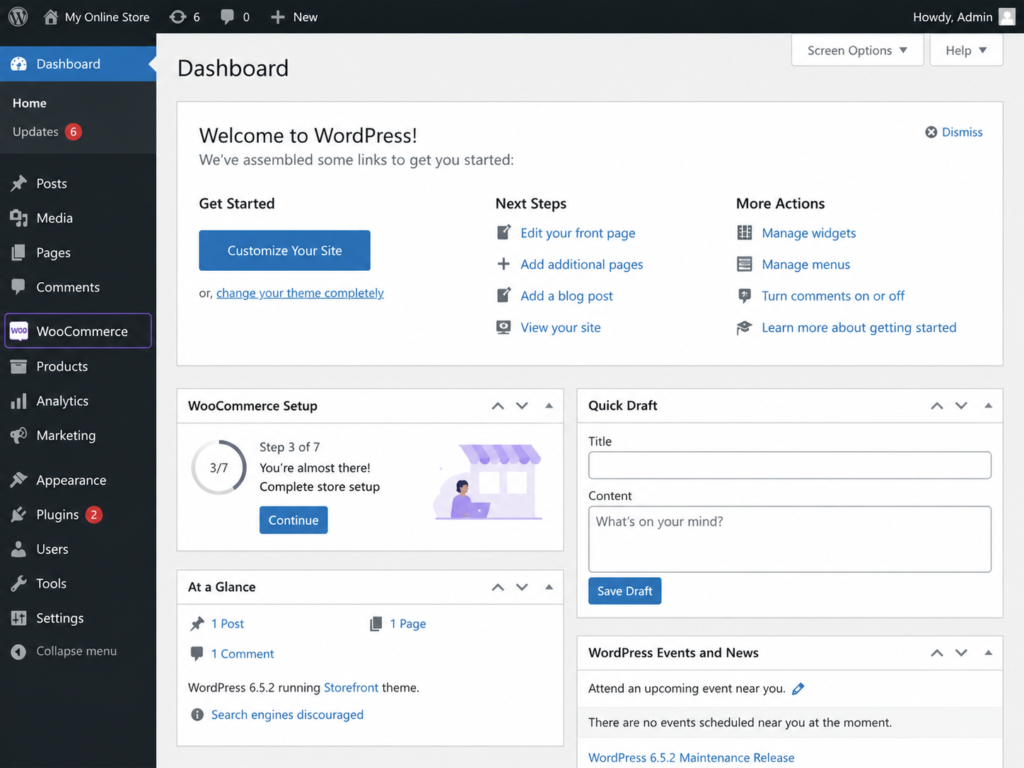
With hosting active and domain connected, installing WordPress takes under five minutes through your hosting control panel.

WordPress dashboard displaying the WooCommerce plugin and store setup panel.

Installing WordPress

Start by logging into your hosting control panel and locating the WordPress installer, which is usually available as a one-click installation tool. Enter your website details, including your site name, admin email address, and secure password. Once everything is filled in, click Install, and WordPress will be set up and ready to use within a few minutes.

Installing WooCommerce

After your WordPress website is running, open your WordPress dashboard and navigate to Plugins β†’ Add New. Search for WooCommerce, then click Install Now and activate the plugin once installation is complete. After activation, WooCommerce automatically launches its Setup Wizard to help configure your online store.

Completing the WooCommerce Setup Wizard

The WooCommerce Setup Wizard guides you through the essential store settings needed before launching. You’ll set your store location and currency, which define default tax and shipping regions. Next, choose your product type, whether you sell physical products, digital products, or both. Then enter your business details, such as business name, industry, and company size. The wizard also lets you configure payment options by selecting your preferred payment gateways and complete the shipping setup by creating basic shipping zones and delivery settings.

Step 4: Choose and Install a WooCommerce Theme

Your theme controls how your store looks and how customers experience shopping. A poorly chosen theme slows your store and confuses visitors. The right theme builds trust and drives purchases.

Choose a WooCommerce theme that is mobile responsive, fast loading, and fully WooCommerce compatible. It should have clean product layouts with clear images and add-to-cart buttons, while also being customizable to match your brand’s colors and style.

Free WooCommerce Themes Worth Considering

Storefront β€” WooCommerce’s official free theme. Clean, fast, and perfectly compatible. Great starting point for new stores.

Astra β€” Extremely lightweight and highly customizable. Works seamlessly with Elementor and WooCommerce.

Kadence β€” Modern design with strong performance. Free version handles most store needs comfortably.

Step 5: Add Your Products

Products are the core of your store. Setting them up correctly from the start makes everything else β€” inventory, shipping, and sales β€” significantly easier to manage.
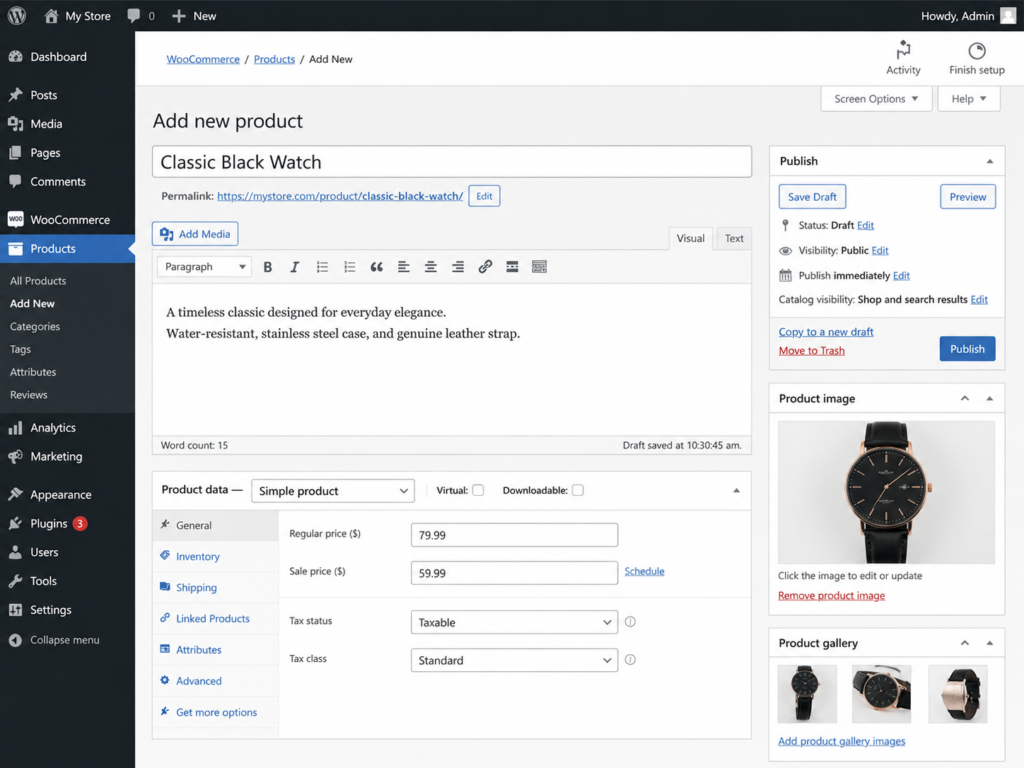
WooCommerce product editor dashboard showing product title, pricing, inventory, and product settings fields.

To add a simple product in WooCommerce, go to Products β†’ Add New in your WordPress dashboard. Enter a clear Product Name, write a unique Product Description, and add a short description highlighting key benefits. Set the regular or sale price, upload optimized product images, and organize products using categories and tags for better navigation and SEO.

Consequently, customers select their preferred options on the product page without visiting separate listings.

Step 6: Set Up Payment Gateways

Payment gateways connect your store to the systems that process customer transactions. Without a properly configured gateway, your store cannot complete sales.

Built-In WooCommerce Payment Options

WooCommerce includes these options out of the box:

  • Direct Bank Transfer β€” customer pays manually via bank
  • Cash on Delivery β€” payment at delivery
  • Check Payments β€” physical check (rarely used for online stores)
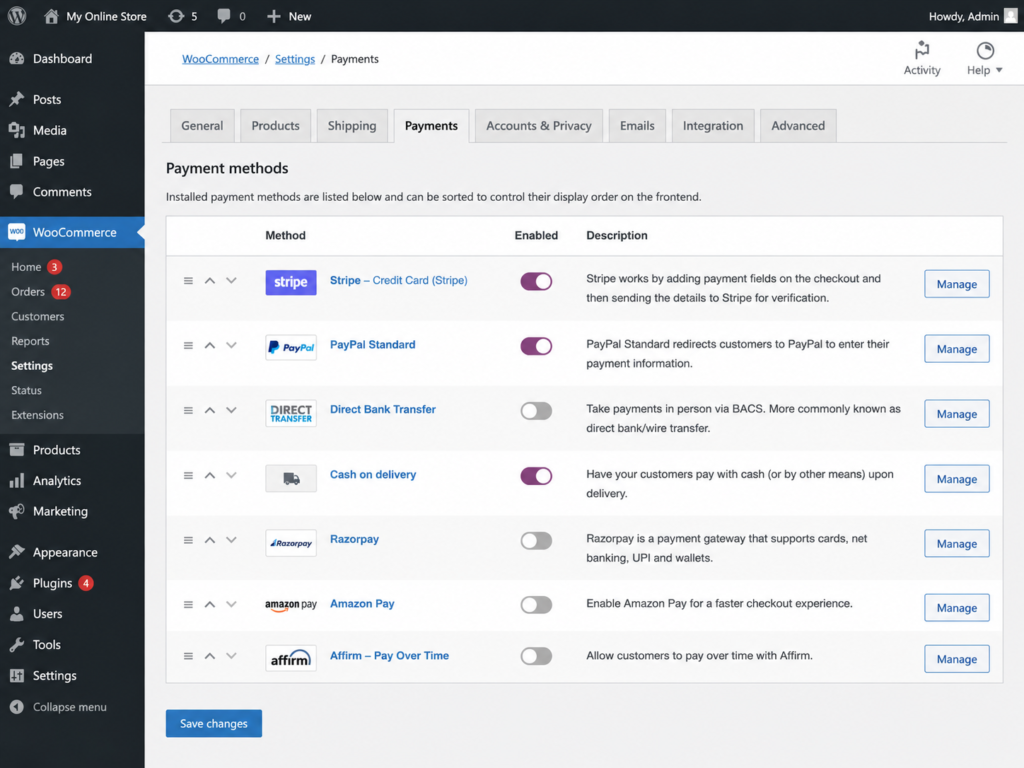
These work without additional plugins but suit only specific business models.
WooCommerce payment settings page showing multiple payment gateway options and configuration controls.
Best Payment Gateways for Indian WooCommerce Stores

Razorpay β€” The most popular gateway for Indian stores. Supports UPI, net banking, credit cards, debit cards, and EMI in one integration. Furthermore, setup is straightforward with a dedicated WooCommerce plugin available free from the WordPress plugin directory.

PayU β€” Strong coverage of Indian payment methods with competitive transaction fees. Moreover, PayU works well for high-volume stores with negotiated rates.

Cashfree β€” Newer option with fast settlement times and clean API integration.

PayPal β€” Best for international customers. Add PayPal alongside a local gateway to cover both domestic and global buyers.

SSL Is Mandatory for Payments

Every payment gateway requires HTTPS. Without SSL, payment gateways refuse to process transactions and customers see security warnings.

πŸ‘‰ Read our complete guide: Do You Need SSL for Your WordPress Website?

Step 7: Configure Shipping Settings

Shipping configuration determines how orders reach customers and what they pay for delivery. WooCommerce’s shipping system is flexible enough to handle local delivery, domestic shipping, and international orders simultaneously.

Step 8: Install Essential WooCommerce Plugins
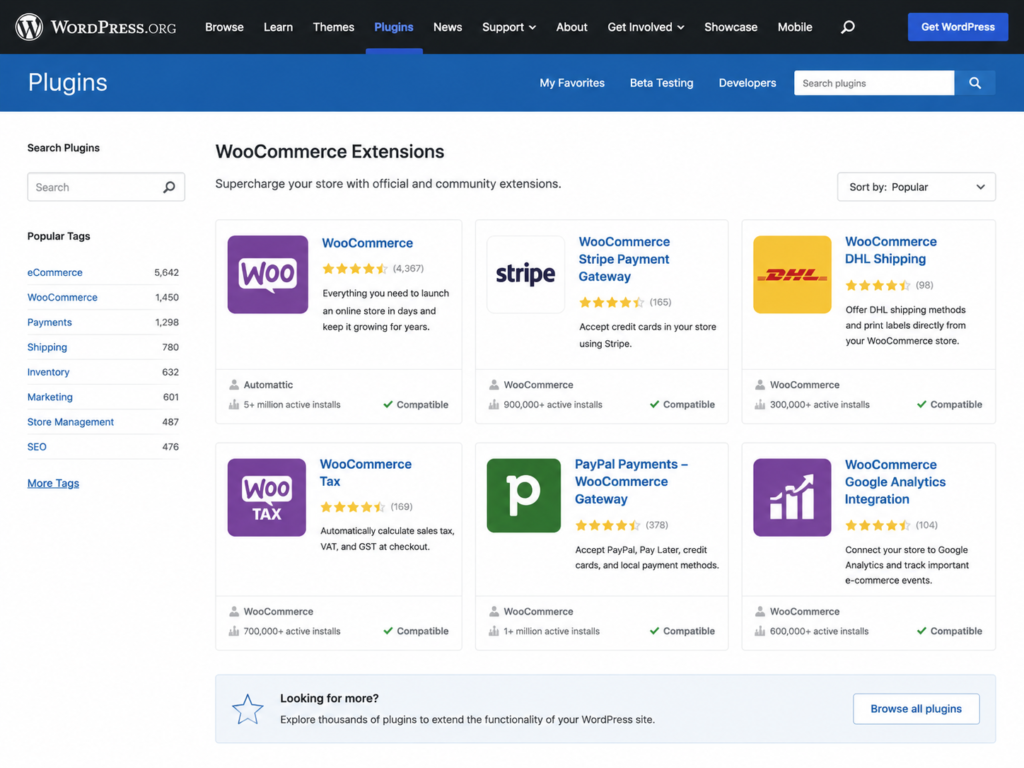
WooCommerce’s core handles most store needs. However, these plugins add important capabilities that most stores benefit from immediately.
WordPress plugin directory displaying popular WooCommerce extensions and add-ons.

Security Plugin

Wordfence or Sucuri β€” Protects your store from brute force attacks, malware scanning, and firewall protection. Furthermore, a security plugin protects your customer data and business reputation.

Backup Plugin

UpdraftPlus β€” Automated daily backups sent to cloud storage. Consequently, complete store recovery is possible after any server issue, hack, or accidental deletion.

SEO Plugin
Rank Math or Yoast SEO β€” Optimizes product pages, generates XML sitemaps, and manages meta titles and descriptions across your entire store.

πŸ‘‰ Complete setup guide: How to Install and Set Up Rank Math SEO

Performance Plugin

WP Rocket or W3 Total Cache β€” Caching, minification, and lazy loading for faster store page speeds.

Contact Form Plugin

Contact Form 7 or WPForms β€” Customer inquiry forms for product questions, returns, and support requests.

πŸ‘‰ Learn more: How to Use Contact Form 7

Step 9: Optimize Your Store for SEO

SEO brings customers to your store without paying for every click. A well-optimized WooCommerce store attracts consistent organic traffic that grows over time.

SEO brings customers to your store without paying for every click. A well-optimized WooCommerce store attracts consistent organic traffic that grows over time.

Step 10: Launch and Start Marketing Your Store
A live store with no visitors generates no revenue. Marketing starts on launch day β€” not after you feel “ready enough.”
Rocket launch illustration representing a WooCommerce store going live online.

Immediate Launch Actions

Submit to Google Search Console β€” Add your store URL and submit your XML sitemap. Consequently, Google begins crawling and indexing your products within days.

Connect Google Analytics β€” Install GA4 to track visitor behavior, traffic sources, and conversion rates from your very first visitor.

Set Up Google Shopping β€” Free Google Shopping listings appear in product search results and drive high-intent traffic from buyers actively looking for what you sell.

Content Marketing for Organic Growth

A blog connected to your WooCommerce store builds long-term organic traffic without ongoing advertising spend.
Write about topics your customers search for β€” buying guides, product comparisons, how-to articles, and seasonal recommendations. Moreover, link from blog posts to relevant product pages. Consequently, blog visitors discover your products naturally through helpful content rather than intrusive advertising.

Social Media and Email Marketing

Build an email list from day one using a newsletter opt-in on your store. Email marketing delivers the highest ROI of any digital marketing channel for e-commerce. Furthermore, social media platforms β€” especially Instagram and Pinterest for visual products β€” drive discovery traffic that converts to store visitors.

WooCommerce Store Cost Breakdown
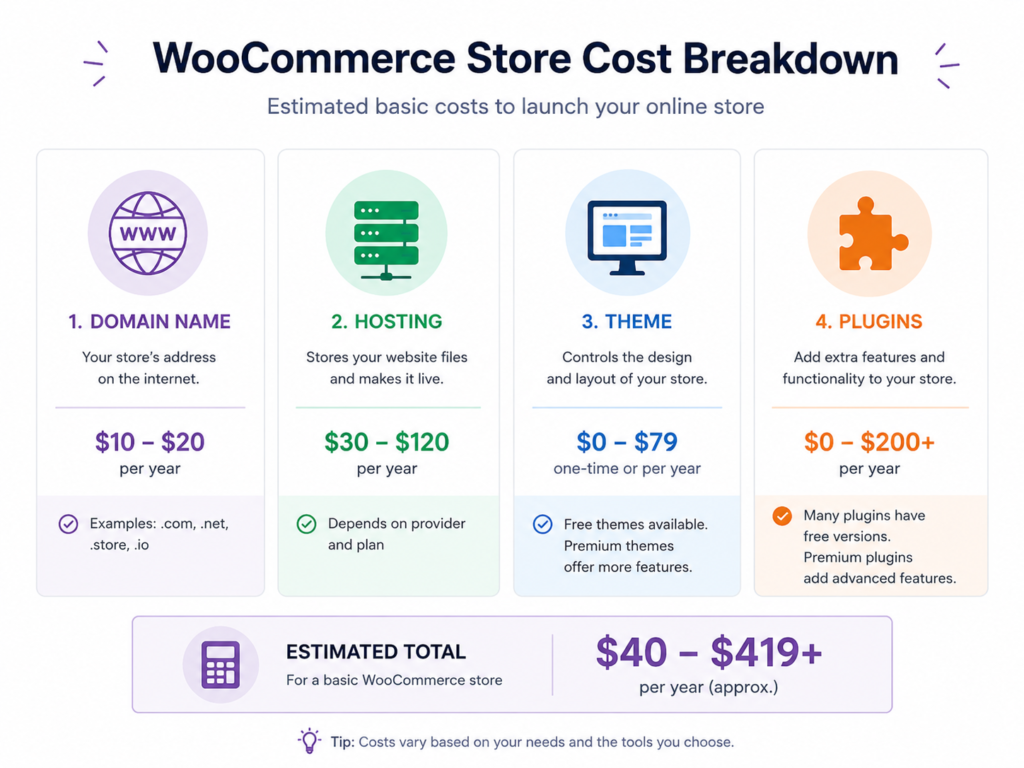
Cost breakdown infographic showing domain, hosting, theme, and plugin expenses for a WooCommerce store.
Understanding your full cost picture helps you budget realistically.
ItemEstimated Cost
Domain Nameβ‚Ή800 – β‚Ή1,500 / year
WordPress Hostingβ‚Ή2,500 – β‚Ή25,000 / year
WooCommerce PluginFree
WordPress ThemeFree – β‚Ή8,000 (one-time)
Essential Pluginsβ‚Ή5,000 – β‚Ή20,000 / year
SSL CertificateFree (most hosts)
Payment GatewayPer-transaction fee
Total (Basic Store)β‚Ή10,000 – β‚Ή30,000 / year

Conclusion

Building an online store with WordPress and WooCommerce follows a clear, manageable process.
Choose hosting β†’ Register domain β†’ Install WordPress and WooCommerce β†’ Set up theme β†’ Add products β†’ Configure payments β†’ Set up shipping β†’ Install plugins β†’ Optimize for SEO β†’ Test β†’ Launch.
Furthermore, every step in this guide reflects what successful store owners actually do. Consequently, following this process gives your store the same foundation that powers millions of e-commerce businesses worldwide.
WordPress and WooCommerce give you complete ownership, unlimited scalability, and a flexible ecosystem that grows with your business. Moreover, the total annual cost sits significantly below what closed platforms charge for equivalent functionality.

Therefore, start with Step 1 today. Your online store is closer to launch than you think.

Frequently Asked Questions (FAQs)

Yes β€” WooCommerce itself is completely free. You pay for hosting, domain, and any premium plugins or extensions you choose to add.

Absolutely. WooCommerce and WordPress handle everything through visual dashboards. Furthermore, page builders like Elementor let you design product pages without touching code.
A basic store with 10-20 products takes most people one to two weekends to build following this guide. Consequently, you can be live and accepting orders within your first week.
Yes. WooCommerce handles digital downloads, software licenses, ebooks, and online courses natively. Moreover, dedicated plugins extend digital product functionality further for specific needs.
Razorpay is the most popular choice for Indian WooCommerce stores β€” covering UPI, net banking, cards, wallets, and EMI in one plugin.

Table of Contents

Scroll to Top